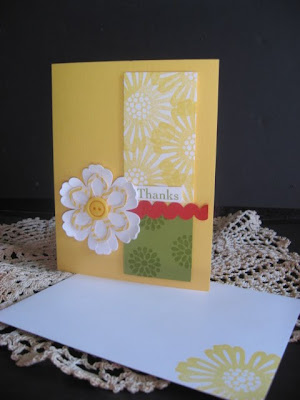
Wednesday, February 29, 2012

Joyful Heart Breakfast Gathering---Recap

I’m finally back—wow, the last 2 weeks of my life have been extremely hectic and the last month has been a roller-coaster ride—I’m sorry I haven’t gotten anything posted.

We are right in the middle of Sale A Bration so I hope that you’ve had a chance to update your stamping supplies And earn some free SAB items!

The following are our projects at the meeting as well as some of the things that were shared:

IMG_8054

This stamp is from the packed for birthday stamp from the mini as well as the Party the Way stamp set that is free with a $50 purchase.  Saw this idea at Leadership and loved how simple it was to do!


IMG_8053


Shelli, the company owner, showed this card on stage and I loved it!

Tips:

  • the feathers are made with the blossom builder punch—just one of the leaves.
  • I scored the paper, then cut it so that the score line was down the center of the ‘feather’. Then you just make small slits,  slanted downward on each side and cut out a few to make it look like irregular feathers. 
  • To make the speckles: I just take one of my empty brad containers and spray some water in, put a drop of ink color then take my aqua painter and get the tip wet with the inky mixture, then just hold it over my paper and tap with scissors or something heavy, to make the color splat onto the card. 
  • I used Early Espresso, Island Indigo and Crumb Cake for my ink colors too.  Hope you enjoy!

IMG_8051 I did this page to give the gals a sample of a bunch of our embellishments!  First, you have shimmer brads, then buttons, then flower brads, then regular brads and not to mention, pearls.  I did want to put our clear buttons on but the page looked a little full. The picture is of my daughter, Briana on the left and her friend, Briawna on the right.


mtg

We did these cases for the framelit dies---you attach our magnetic sheets inside to easily hold the dies in one place!


It’s just one of our empty stamp cases.


IMG_8052


This card  was a swap that I saw at Leadership.  What an amazing idea!

Uses the punches: postage stamp, blossom punch, eyelet border, and 1” circle punch.

Tip: there is a piece of island indigo cardstock that the postage stamp punched pieces (takes 5-6 of each design) are glued to, then the edges are punched by the eyelet border punch.

Some of the swaps and demos:

IMG_8999 IMG_8997

2 of Debbie Paisie’s Demos and then here’s her pages:

IMG_9000


IMG_9003


I have pics of Debbie’s cause she left them so everyone could look at.

Jody Demo’d how to do a spirograph with the Baker’s Twine and scallop circle punch out.  Jody, can you send me a pic to post here?”

Mandy demo’d how to do crayon and wax art with an iron and did some adorable ideas—once again, I have no pics…can anyone share?

Lynne showed some great ways to use our empty stamp cases for storage or creative uses.  Does anyone have photos?

Wednesday, February 8, 2012

Stamps in the Mail Club

IMG_7962 

IMG_7963


The stamp set this past month was Pennant Parade. We had so much fun making these samples:

IMG_8932 

I hope everyone enjoyed them!

In February we begin a new club and the stamp set for February is Bordering On Romance.  Cost is $28 ($38 wood) and you receive a package in the mail with 3 cards made with this stamp set as well as the set and a little thank you from me!

Club info: This club is 8 months in duration and this time the cost is variable will keep it as close to $25 as possible.  If you haven’t confirmed your membership, you’ll want to do so right away.  The cut off deadline is February 14th-Valentines Day.

Saturday, February 4, 2012

Designer Cuts—upgraded pics

IMG_7948

My upline, Connie Heisey, asked me to demonstrate our fabulous laser-cut cards and show different ways to dress them up so here is what I came up with.  Now, notice I said ‘our fabulous’.   I did not know they were fabulous until I started playing with them.  On this one, I just cut a piece of pool party to layer inside the heart, a touch of pool party seam binding and a saying in the same, one little pearl for accent!


I found an idea like this online at Flowerbug’s site, I spritzed some of the Pink Smooch spritz, then on the inside I cut a piece of Riding hood Red CS at 3 3/4” X 3 IMG_79453/4” square.  I put 1/2 pieces of dimensionals the whole way around the heart, then centered my piece of RHRed .  My purpose was to get the cardstock to stay back from the cutouts so that you could get a shadow effect when you looked at it.  I added our yummy Riding Hood Red pleated satin ribbon and a few pearls.


Then I showed how to do this design.  I had some scraps of the silver glimmer paper (which is still available for purchase hallelujah!) so I cut some squares to cover the ‘diamond’ cut out patIMG_7959tern.  I laid them face down on the inside of the pattern—put glue on the back of them.  Then I placed my 2 1/2”X 5 1/2” Piece of Rich Razzleberry Cardstock on the bottom portion of the front so show through behind the glimmer paper.  What fun!

Coloring Pearls:

What I really wanted to show you was something that I learned at Leadership and that was to color our pearls.  I used the jumbo pearls from the mini just because I’m totally out of pearls!  Yes, I had like 6 packs but shared some with a friend for a wedding.  Okay, you just sponge regular ink onto the pearls while they’re still attached to the paper they come on.  then you heat with a heat gun for a few minutes to set the ink, I did this 2 times to get a nice coverage!  Isn’t it great?

IMG_7955

And one more, I saw a similar idea online, which was also Flowerbug’s site.  I loved the idea of weaving ribbon through the design.  I once again used a piece of Blushing Bride CS 2 1/2” X5 1/2” but I only glued it near the top of the design so that it looks like its away from the design and once again you get that shadowy look through the die-cut.  I hope you enjoyed this little showcase as much as I  loved sharing it!


IMG_7964 Oh, and just as I got home from the meeting and sharing these ideas with all my friends and fellow demos, I got this gorgeous card in the mail from Jill Olsen who is my upline—it was a congratulations for being in her top 30 for sales in December.  I was so excited—I had to show it to you as well because she sp0nged her Silver Glimmer Cardstock with Blushing Bride Ink and “wow’ what a pop.

One more I just found—it’s a pic from Leadership of these cards used in 2 totally different ways—Enjoy:

IMG_8777

It’s amazing how creative you can feel using cards that are already die cut for you and how quick it is to end up with some beautiful, hand-stamped cards.  Definitely for the creative gal who has little time.  Here’s a list of the supplies I used to do all these cards.  You’ll find it’s a surprisingly small list and you can get this and get a FREE SAB item through the month of March.

Designer Cuts  $9.95 8 cards with pink envelopes  #125414

and I highly suggest that you get at least 2 packs right away because these cards are so quick to design that you’ll want to keep making them and you’ll think of tons of friends to send them to and impress them with your creativity!

Vanilla Envelopes $6.50  to go with the cards that I made a different color than pink  #107300

Boho Blossom Punch  $16.95  #119858

Vanilla Seam Binding  $6.95  #120999

Pool Party Seam Binding $6.95  125582

Riding Hood Red Pleated Satin $6.95  #125569

Blushing Bride Pleated Satin Ribbon  $6.95  #125570

Chantilly Ribbon $6.95  #118480

Pearls $4.95   #119247

Jumbo Pearls $4.95  #125577

Blushing Bride Smooch Spritz $4.95  #125580 

Riding Hood Red CS and ink  $6.95 and $5.95

Pool Party CS and ink $6.95 and $5.95

Blushing Bride CS and ink $6.95 and $5.95

Rich Razzleberry CS and ink $6.95 and $5.95

Silver Glimmer CS   $4.95  #124005

The stamp set I used is Sweetly Said-Clear #122862  pg. 158  $12.95

Some of this stuff you probably have on hand, but if not, this order will total close to $150 which means you get to choose 3 FREE SAB items plus you get the cool hostess bag and $25 to spend in the catalogs. 

jeanna-001

Click here to place  your order now—or email me if you rather I place it for you.

Friday, February 3, 2012


The catalog picture does not do this little kit justice, let me just say! Stampin’ Up! gave us a whole kit to use on our make and take projects at Leadership. For only $9.95 you can make a bunch of products. Here are 2 of the projects that we made and I think they turned out adorable.

The shape behind the flowers is made from a piece of the chipboard kit, On Board Merry Medley.


We did 2 of these cards so that we could give one to Ronald McDonald House Charities!

This card uses Mixed Bunch for the background stamping and the blossom punch.

If you’ d like to add this kit or this stamp set and punch to your collection, here are the details:

Designer Printed Kit #125410 $9.95

Mixed Bunch Stamp set cl # 125537 $21.95

wood #125535 $27.95

Blossom Punch #125603 $16.95

On Board Merry Medley Chipboard #122958 $9.95

Brights Buttons ( you can get FREE with a $50 purchase during SAB or order) #127714 FREE or #119745 $9.95


Stamps in the Mail Club

IMG_8952

One of the choices for January was Established Elegance.  I think this stamp set is so beautiful.  Here are 3 of the designs I came up with for the club that went out with the orders the end of January (always with inspiration from someone elses beautiful creations!) and then a few that I touched up from other cards. Soft Suede, Black, Rich Razzleberry and Vanilla


IMG_8957

Crumb Cake, Pool Party.

I really got into the little jewelry tag punch and our little pins.


Check out the soft border done with the scalloped ribbon border punch in tone on tone.


IMG_8958

This one is in Certainly Celery, Early Espresso, Crumb Cake, Vanilla and a touch of Blushing Bride


IMG_8961

IMG_8962

Thursday, February 2, 2012

Projects from Saturdays Stamp A Sampler

For those of you who are finishing your projects from Saturday, here are the completed projects (the last card we decided to change it up to lucky limeade ribbon and rich razzleberry ink for coloringIMG_8937.)

IMG_8939 


IMG_8938IMG_8941

IMG_8942  IMG_8940


IMG_8943

IMG_8944


IMG_8945

IMG_8946


IMG_8947

  IMG_8964


IMG_8948

IMG_8949


IMG_8950

IMG_8963